 In order to create a new maintenance plan in Management Studio, first connect to the target server using Windows Authentication, then right-click on the Maintenance Plan folder in Object Explorer, select New Maintenance Plan, and enter the plan name. As a result, a Maintenance Plan design panel will appear on the right, and a toolbox with available Maintenance Plan Tasks will be displayed on the left. Click on the Connection button to verify that the current connection uses Windows Authentication (recommended by Microsoft). Currently connected Windows user will become the owner of the job created by this maintenance plan.
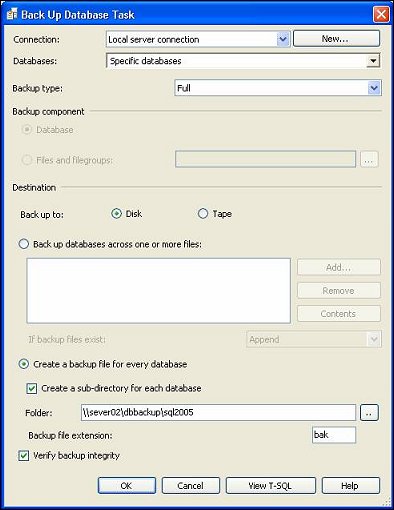
The first step in creating a database or transaction log backup is to drag and drop Back up database task from the toolbox to the design panel. Then double-click on that item to set the following necessary properties:
Databases: Click on the dropdown field to bring up the database selection window.
The first step in creating a database or transaction log backup is to drag and drop Back up database task from the toolbox to the design panel. Then double-click on that item to set the following necessary properties:
Databases: Click on the dropdown field to bring up the database selection window.

When you are done, the Back up database task properties window should look like the one shown on Figure 2.
Having verified the task properties, click OK. Now you can create a schedule for this plan. Click on the
[…] button located to the right of the Schedule field and set the necessary parameters in the Job Schedule Properties window. Schedule name will be defaulted to
When you click on the Logging button, the Reporting and Logging window appears.
The default folder for the backup log is C:\Program Files\Microsoft SQL Server\MSSQL.1\MSSQL\LOG, and it can be modified. You can also choose between the Create a new file option that will create a new log file named
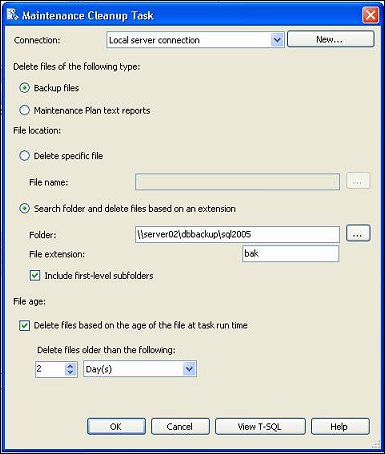
In order to delete obsolete backup files, an additional Maintenance Cleanup Task must be inserted and configured. Drag and drop this task into the design panel and double-click on it to set the properties:
Connections: keep the default Local server connection.
Delete files of the following types: choose the Backup files option.
File location: choose Search folder and delete files based on an extension and provide the same full path to the backup folder as you did on the Back up database task.
The file extension also should be the same as that used in Back up database task: bak for the database backup files or trn for the transaction log backup files (both without a leading dot). If you created a separate directory for each database in Back up database task, you can also check the Include first-level subfolders box.
File age: check Delete files based on the age of the file at task run time and set the Delete files older than the following option. If you click on the View T-SQL button, you will see a new undocumented stored procedure, xp_delete_file, with the following parameters:
After the properties have been specified, the Maintenance Cleanup Task properties window should look like this:

The Maintenance Cleanup Task should be executed only upon successful completion of the Back up database task. To ensure this, we have to link both tasks with a constraint. Click on the first task and then drag an available component output (depicted as a green arrow) to the next task. Double-click on the arrow to check and edit, if necessary, the Precedence Constraint properties: Evaluation operation: Constraint. Value: Success. Multiple constrains: By default, it is Logical AND. In this case, it does not matter because we only have one constraint.
Click on the Save All icon to save the plan. As a result, a new job, with the same name as the maintenance plan name, has been created and you can see both the plan and the job in the Object Explorer panel.
Backup by File - Files or filegroups in a database can be backed up and restored individually.